Notion is a handy, all-in-one workspace for taking notes, managing projects, collaborating with team members, and more.
But sometimes, you end up with an outdated or unused Notion workspace you no longer need. If you’re looking to clean things up and delete a Notion workspace, the process is fairly straightforward—once you know the right steps to take.
This guide walks you through exactly how to delete an unwanted Notion workspace, plus a few extra factors to think about—like saving important data before it’s lost for good.
Important considerations before deleting your Notion workspace
Before deleting a Notion workspace, there are a few things to keep in mind:
1. Deletions are permanent
It’s important to know that once you delete a Notion workspace, there’s no way to recover it. All pages, databases, files, and shared content within that workspace will be gone for good.
2. Backup options are available
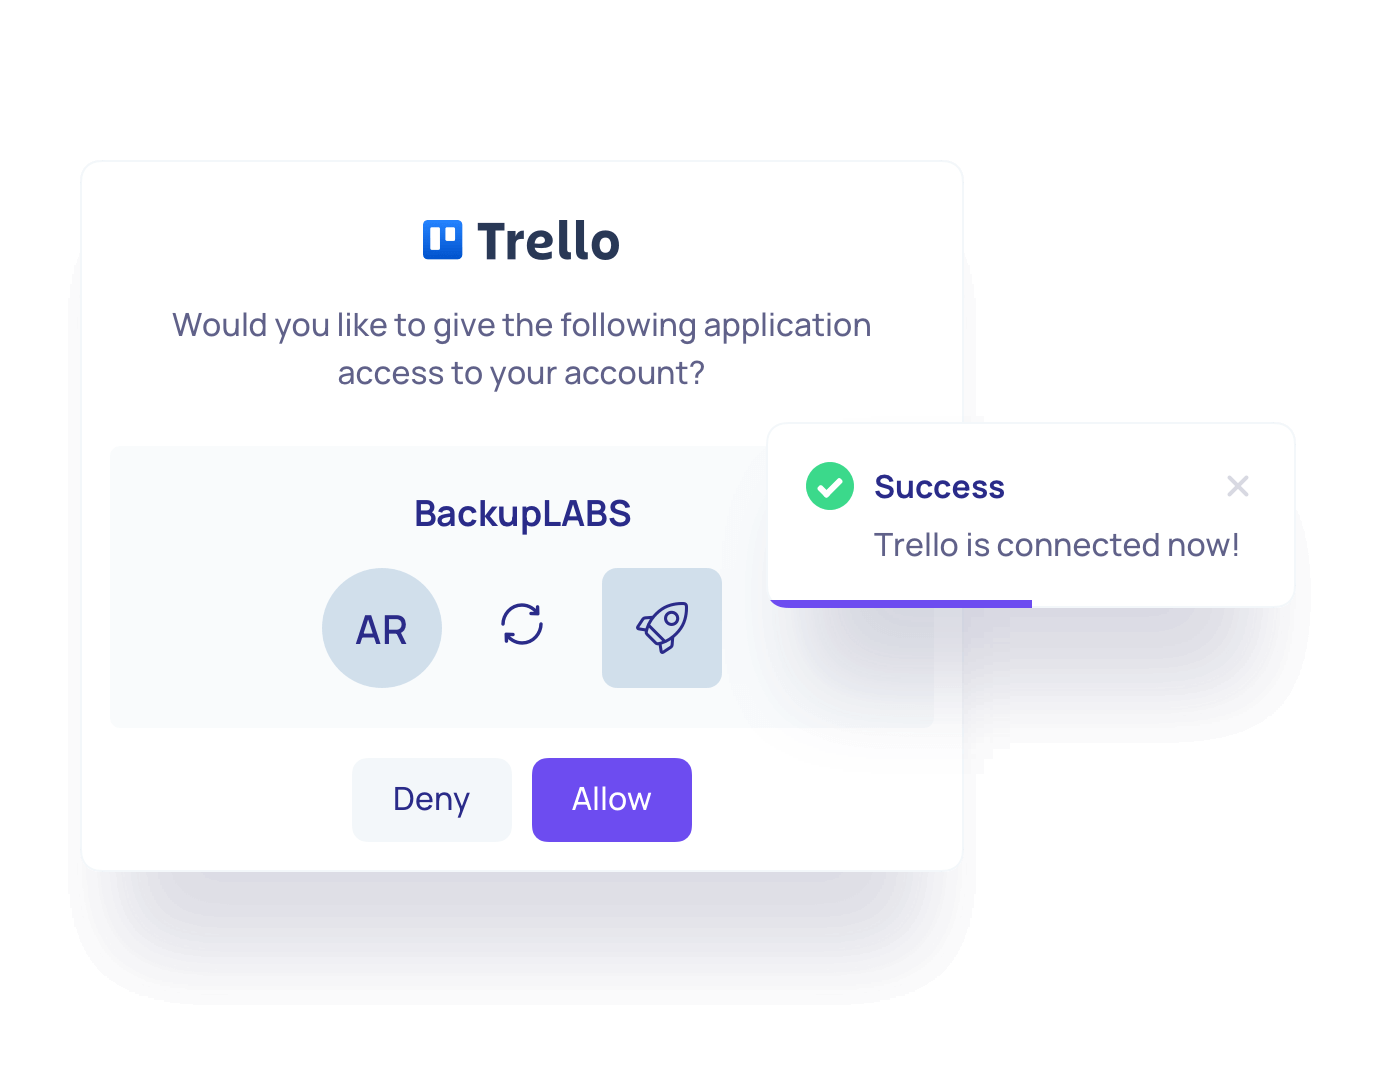
You can’t recover deleted data, but you can manually export your workspace content before it’s deleted from the platform. You can do this through Notion’s in-built export options or through a third-party Notion backup solution like BackupLABS who can handle all backups, exports, and recovery for you as needed.
3. Admin access is needed for deletions
Not just anyone in your organisation can delete a Notion workspace, only admins have that power. Anyone who’s not an admin will have to request access from someone who is to delete a workspace.
How to delete a Notion workspace
If you’re sure you no longer need a Notion workspace and if you’ve taken steps to backup the content, then it’s time to start the deletion process to completely remove it from your Notion database.
Thankfully, it can be done in just a few simple steps:
- Open Notion and select the workspace you want to delete
- Click Settings & Members in the left sidebar
- Go to the Settings tab and scroll down to the Danger Zone section
- Click Delete Entire Workspace
- When prompted, confirm that you want to proceed
- Type the workspace name to verify the deletion
- Click Delete Workspace to complete the process
And there you have it—your workspace (and all its content) is permanently deleted.
What happens after deleting a workspace?
We already know all data will be lost after deleting a Notion workspace (unless it’s been backed up), but that’s not the only change. Here’s what else you can expect:
- Data Loss: All content, including pages, databases, and files, is permanently deleted.
- Access is immediately revoked: The moment the workspace is deleted, all members—including admins—will lose access. If you’re managing a team workspace, let your colleagues know about the deletion in advance so they’re not caught off guard.
- Paid subscriptions are automatically cancelled: If the workspace was on a paid business or enterprise plan, the subscription will be cancelled as soon as it’s deleted. You won’t be charged for it going forward, but unfortunately, any remaining time on the plan won’t be refunded.
Alternatives to deleting a workspace
If you’re not 100% sure about deleting your Notion workspace, there are other options that let you clean up without losing everything—permanently. Here are some alternatives to consider:
1. Archive the workspace
If your workspace feels cluttered but still contains useful information, you can always move old or unused pages into an “Archive” section. This way, they’re out of the way but still just a few clicks away if you ever need them again in the future.
2. Transfer ownership
If the workspace is shared and you’re no longer using it—but others are—you can transfer ownership to another member instead of deleting it. This ensures the workspace remains active without you having to manage it.
3. Remove members
If you want to step away from a workspace but aren’t ready to delete it for good, you can always remove all other members from the workspace.
This way, there’ll be no confusion among the team about whether the workspace is or isn’t in use. It’ll be out of sight and out of mind. Plus, you can always re-add team members in the future if you change your mind.
How to backup your Notion data
You have two options for backing up your Notion workspaces—do it yourself (manually) or work with a backup provider (third party).
1. Manual backups
Manual backups are carried out using Notion’s Export feature, which lets you export data as a HTML file, Markdown file, PDF file, or CSV file for safekeeping. You’ll need to carry out these backups on a regular basis to keep versions up-to-date and avoid any data loss disasters.
2. Third-party backups
A third-party Notion data backup service—like BackupLABS—lets you effortlessly back up and restore data stored within Notion Cloud, including media files, text-based documents, code snippets, private pages (with restricted access), and more.
Unlike manual exports, these services run automatically, so you don’t have to worry about remembering to back up your work. Your data is always safe without any extra effort on your part.
Key takeaway
Deleting a Notion workspace is a straightforward process, but once it’s deleted it’s gone for good. That’s why it’s so important to protect your data beforehand in case you accidentally delete something valuable.
You can backup your Notion data manually with Notion’s Export feature or automatically with a third-party backup solution.
If you’re unsure about deleting, consider alternatives like archiving, transferring ownership, or removing members. These can all help you clean up your workspace without doing anything you can’t undo.
Get started with BackupLABS
Backup your Notion account data with BackupLABS and enjoy:
- Easy backups: Quickly backup and restore your Notion data with just a few clicks—no coding needed!
- Strong security: Your information is safely encrypted using trusted 256-bit AES encryption.
- Stay compliant: Keep clear, accurate records of your Notion data to meet regulations and standards.
- Generous storage space: Enjoy ample storage for your backups without worrying about running out of space.
- Always here to help: Our friendly support team is available 24/7 to assist with any issues.
- Daily updates: Get simple, daily reports on your backup status so you always know your data is safe.
Try BackupLABS for yourself. Sign up for our 14-day free trial.
Step-by-Step Guide: How to Delete Trello Boards, Lists, and CardsTrello is a great tool for organising projects and managing workflows. But, over time, it can get cluttered. Old boards, outdated lists, and unnecessary cards start piling up. Before long, it becomes hard to find what you actually need.
A quick cleanup goes a long way! By deleting unwanted Trello elements, your workspace stays tidy, and you can easily find what you need. Plus, knowing how to delete old data is important for keeping your workspace secure and meeting data compliance policies.
Here, we’ll walk you through the process of deleting Trello boards, cards, and lists in just a few simple steps.
How to Delete a Trello Board
Trello doesn’t offer a direct “delete” button for boards. Instead, you can close the board, which removes it from your active boards list. If you have a limit on the number of boards on your account, by closing a board, you free up space.
- Open the board you want to close
- Click on the Show Menu button in the upper-right corner

- Select More and then choose Close Board
- Confirm the action
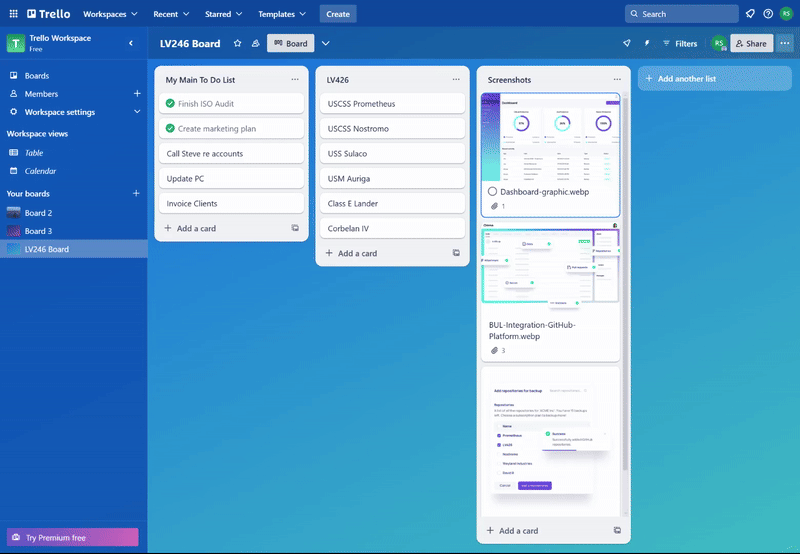
If you want to permanently delete a board, you’ll need to take additional steps:
- After closing the board, click Boards on the left hand side of Trello, then click View Closed Boards
- Locate the closed board
- Click Delete next to the board’s name

- Confirm the deletion by clicking Delete
Warning: Permanently deleted boards cannot be restored.
How to Delete Cards in Trello
Cards represent individual tasks or items in Trello. If you no longer need a card, follow these steps to delete it:
- Click on the card you want to delete
- Scroll down to on the Actions menu on the right-hand side
- Select Archive. This moves the card to the archived section

- After archiving, click the Delete option that appears
- Confirm the deletion when prompted
Note: Deletion is permanent, and you cannot recover deleted cards.
How to Delete a List in Trello
Currently, Trello doesn’t allow users to delete lists directly. Instead, you can archive a list to remove it from the board view.
- Hover over the list you want to archive
- Click the three dots (…) in the upper-right corner of the list
- Select Archive This List from the menu
Archived lists can be accessed and restored if needed. However, if you truly wish to “delete” a list, you must manually delete or move each card within it, then archive the empty list.
Top Tips for Managing Your Trello Content
- Use archiving wisely: Archiving is a reversible action and often sufficient for decluttering.
- Backup important data: Before deleting boards or cards, export the data to ensure no critical information is lost. Consider using an automated Trello backup solution for peace of mind.
- Consolidate lists: Instead of deleting, consider merging tasks or organising them into a master list.
Does Trello Automatically Backup Data?
No, Trello doesn’t automatically back up your data. Once you delete a board, card, or list, it’s gone for good—unless you’ve made a backup beforehand.
So, accidental deletions or even malicious actions could lead to the loss of important data. To avoid the risk of losing something critical, you’ll need to back up Trello data regularly.
You can do this by exporting boards manually or using a third-party backup tool like BackupLABS.
Conclusion
The steps in this guide will help you keep your Trello workspace tidy and make sure important data isn’t lost. Deleting old boards, cards, and lists also helps keep things secure and in line with data compliance policies. But remember—Trello doesn’t back up your data automatically. Once something is deleted, it’s gone for good, so always back up important information.
Protect Trello With BackupLABS
BackupLABS is a simple, reliable way to back up your Trello data. Here’s how it works:
- Automatic backups: Your Trello data is backed up automatically every 24 hours.
- Easy restoration: Restore your data to any previous date without overwriting anything – new instances are created each time.
- Data encryption: Your Trello data is securely encrypted with AES 256-bit keys for extra protection.
- No setup required: Connect your Trello boards to BackupLABS with a few clicks – no complicated setup required.
Our pricing for Trello backup is simple and on a per board basis. Start your free 14 day trial of BackupLABS Trello backup today.
Step-by-Step Guide: How to Restore a Trello BoardTrello is a powerful tool for project management and organisation. But accidents happen. Humans make mistakes and systems glitch -boards accidentally get deleted and data gets lost.
But accidents don’t have to mean disaster. When the unexpected happens, it’s important to know how to recover your Trello boards. That’s where a solid backup strategy comes in, helping you recover lost Trello data and protect you from a host of potential issues down the line.
Here, we’ll show you how to easily restore your Trello boards and explain why backing up your data is essential.
Can I Actually Restore a Deleted Trello Board?
It depends! Trello works a bit differently than other SaaS apps. Instead of deleting a board right away, Trello allows you to archive or close a board.
If you archive a board, it’s not really deleted and you can restore it later. Think of it as putting the board in a “recycle bin” to keep things organised.
But if you delete an archived board – that’s permanent. It’s gone for good unless you’ve used a third-party backup tool to save it.
How To Restore Trello Boards
If you’ve accidentally deleted or lost a Trello board, don’t panic! There are a couple of ways to restore your data, depending on the situation.
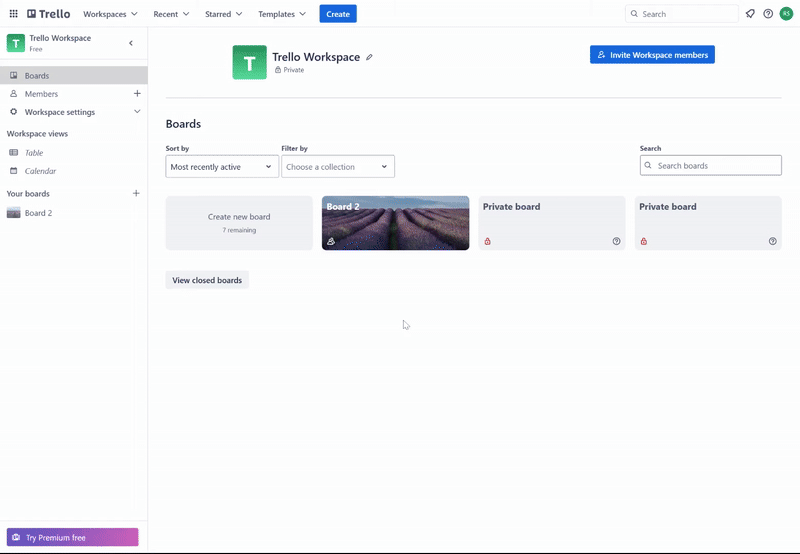
Method 1: Restore Using Trello’s Built-in Recycle Bin
If your board has been archived or closed, it’s easy to restore:
- Log into your Trello account
- Click on the Trello logo to go to your dashboard
- Under “Your Workspaces”, click on “View all closed boards”

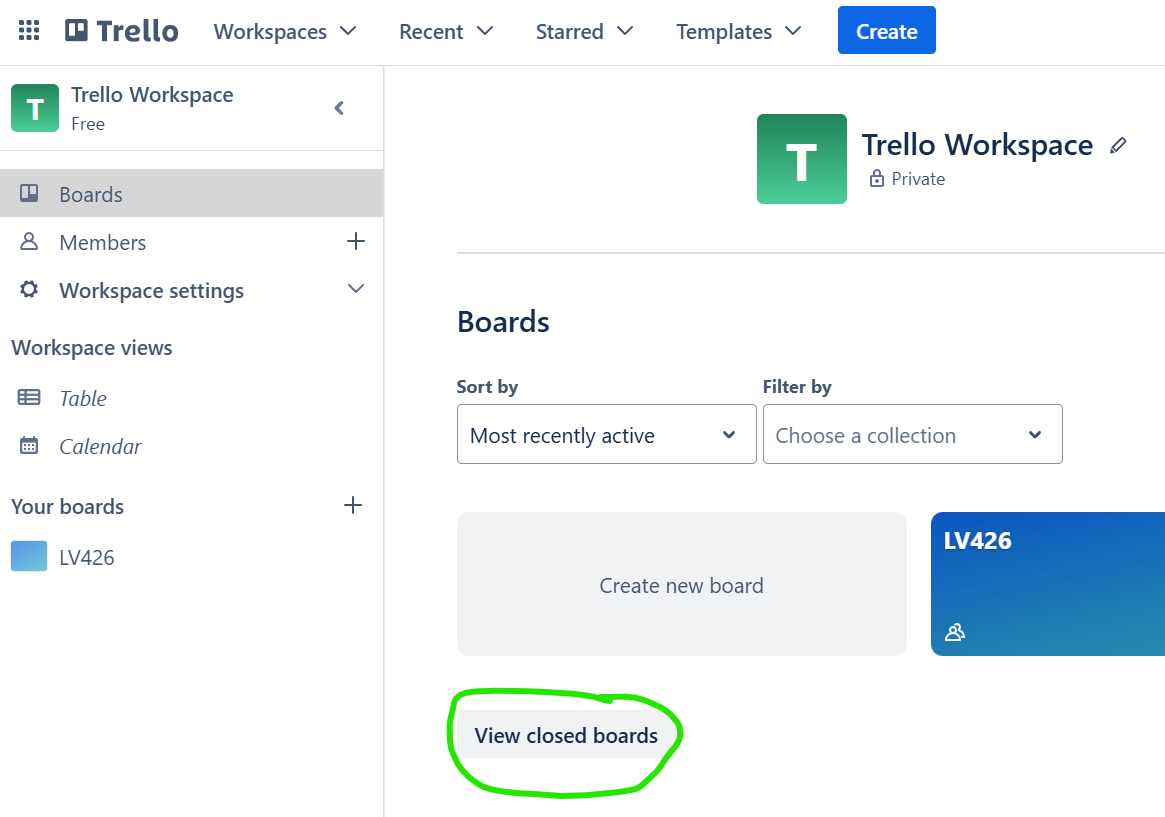
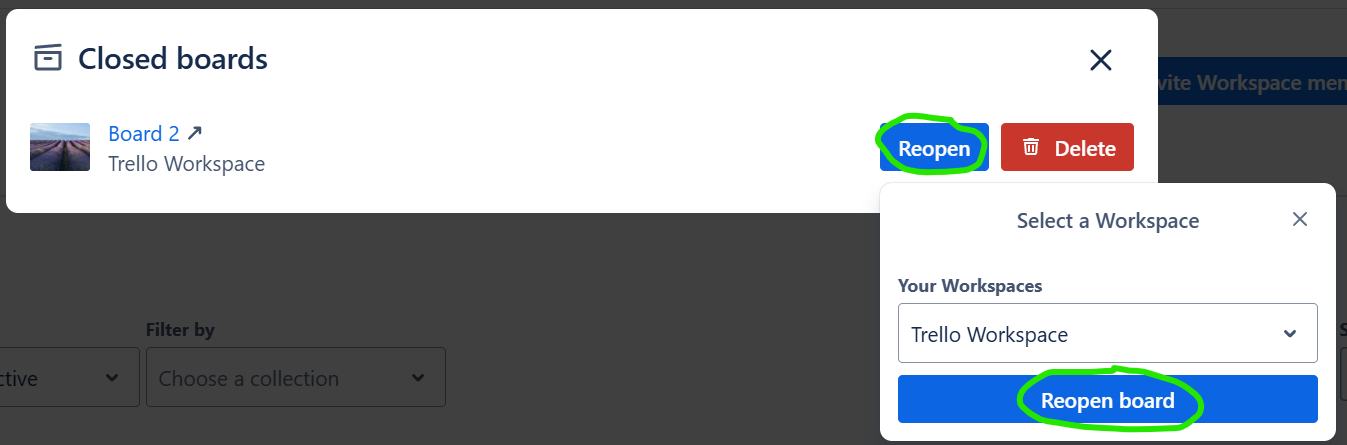
- Find the board you want to restore and click “Reopen”
- Select the Workspace you want to move the board back to and click “Reopen board”

Note: This method only works if the board was archived or closed, not permanently deleted. If you’ve permanently deleted the board, you can’t restore it without a third-party Trello backup solution.
Method 2: Restore Trello boards using BackupLABS
If you’ve permanently deleted a Trello board, you can use BackupLABS to recover it. Here’s how:
- Log into your BackupLABS account
- On the left, under “Your Protected Apps”, select Trello
- Hover over the Trello board you want to recover and click “View”
- Scroll down to find the version you want to restore and click “Restore”
- Double-check the board name or enter a new one
- Enter an email address to receive a notification once the restore is complete (optional)
- Tick “I confirm” and click “Restore”
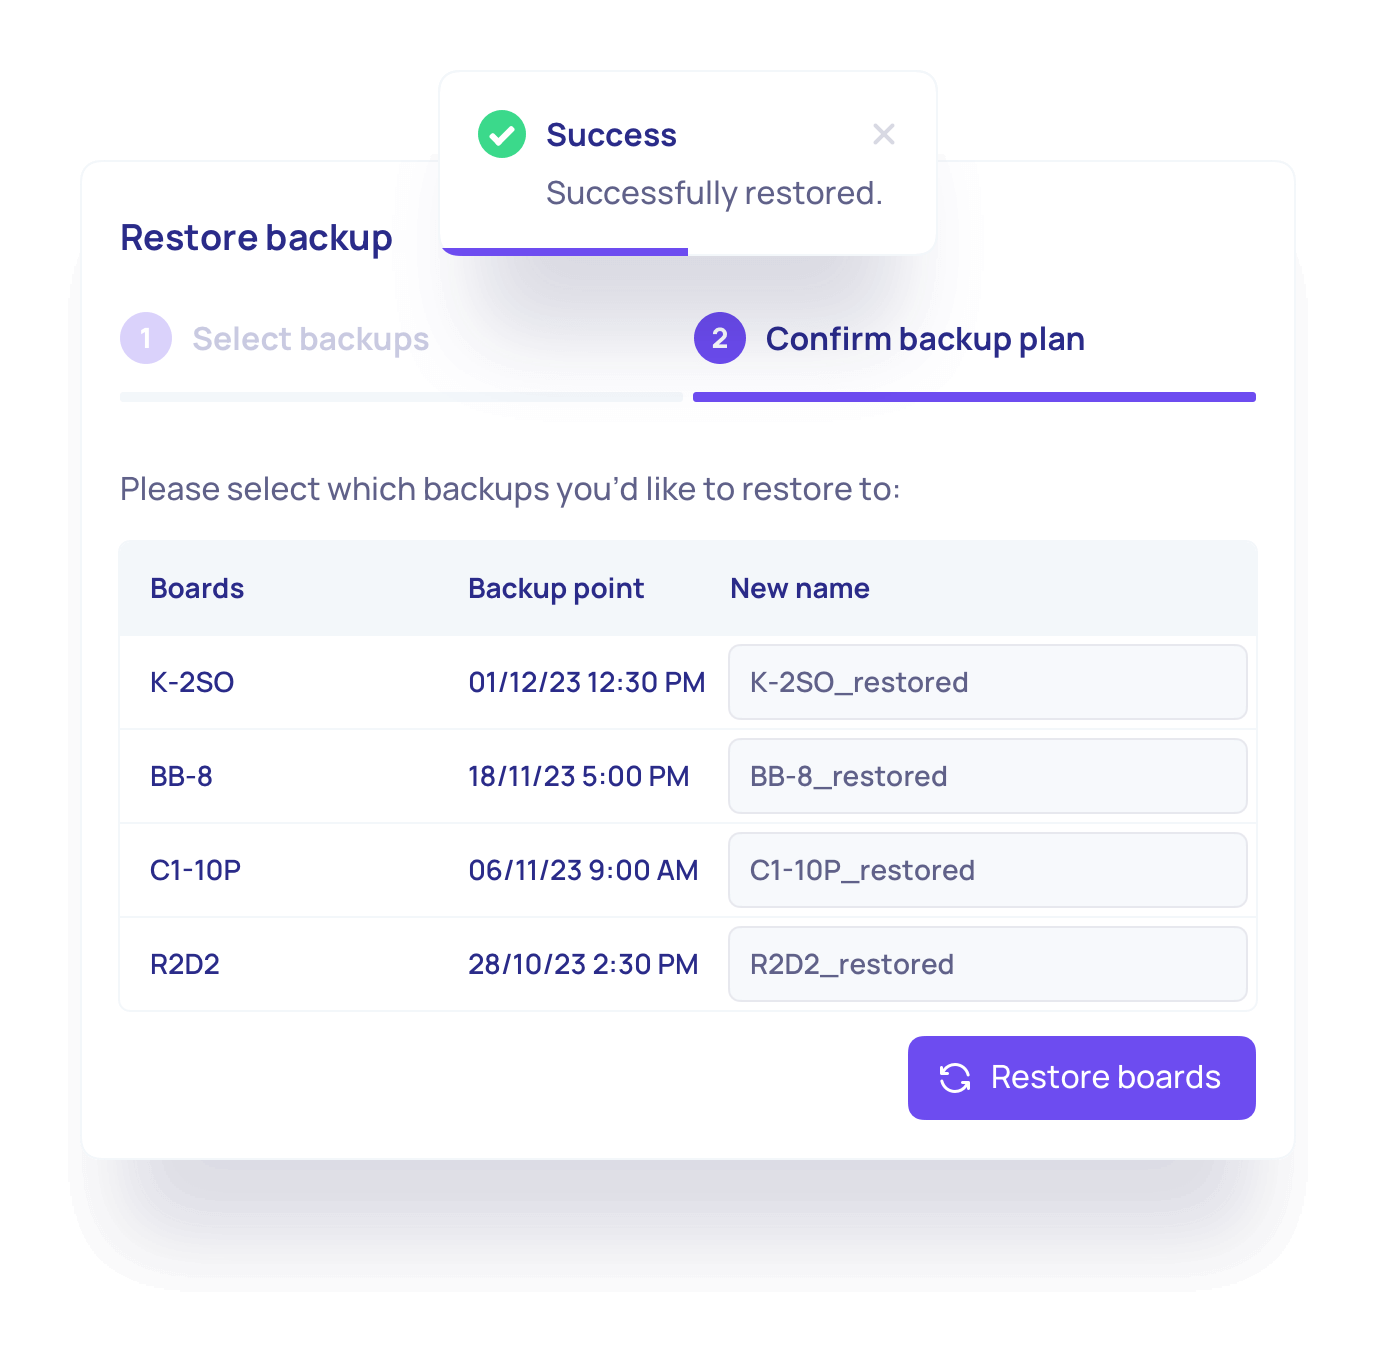
Your board will be restored back to your Trello Workspace!
Why Should You Backup Your Trello Boards?
Whether it’s a system crash or an accidental deletion—losing your Trello boards can cause big problems for your business. But by backing up your Trello boards you can protect your vital data and:
- Avoid delays and downtime: If your Trello boards are down due to a problem, how long could your team work without them? Data loss can cause serious delays. The more time it takes to recover your boards, the more it could cost in terms of time and money. A backup helps you get back to work quickly.
- Keep your projects on track: Losing your data means losing track of your tasks, deadlines, and project details. This can slow down board members’ decisions and damage your reputation—and your bottom line. A backup helps you easily restore your boards and essential info to keep things moving forward.
- Protect against mistakes: Mistakes happen. But with a backup for your entire Trello system, you can fix things quickly without losing valuable data—even if something goes wrong.
Who’s Responsible for Data Stored in Trello?
Trello does backup its platform for its own protection as a business, but it keeps these backups for internal use only. If you lose data, you can ask them to restore it, but they’re not obligated to do so, they may not be able to do so, and they don’t specify how long it could take. Basically, there’s no guarantee they can recover your lost information. There have been countless stories on Reddit about Trello data loss.
This issue is what’s known as the Shared Responsibility Model – where both the platform and the users share the responsibility for data storage and security. Put simply, Trello look after their network and servers, but the responsibility of the data, your data, remains with you.
Key Takeaway
While Trello is an intuitive and reliable platform, accidents and unexpected issues can happen. But with a robust backup strategy in place—and a trusty backup partner who knows how to restore Trello boards and other Trello data—you can protect your valuable project data and keep projects on track.
Backup Trello Data With BackupLABS
BackupLABS offers a reliable way for Trello users to keep their data safe and secure with the following features:
- Automatic and on-demand backups: Back up your Trello cards, lists, and boards, as well as your entire Trello workflow, whenever you need to, with no restrictions.
- Automatic revision history: Track changes to your projects with automatic version tracking.
- Data encryption: Your data is securely encrypted during transfer and storage, ensuring safety during every step of the backup process.
- Offline access: Download your archived data as zip files to access without an internet connection.
- Cloud Storage: Save your backups to your own cloud storage such as Google Drive and Dropbox.
- Account-level recovery: Easily restore entire boards with just a few clicks.
- Audit trail: Full audit trail and logging.
- 24/7 customer support: Get peace of mind with round-the-clock support available whenever you need it.
- Clear metadata coverage: We document what’s supported for full transparency on what’s being backed up, and we keep up with new updates and features.
- Website security: We prioritise security with robust measures to protect your data, meeting industry standards like SOC2 and ISO certifications.
Sign up for our 14-day free trial.
Ultimate Guide to Creating, Using, and Backing Up GitHub GistsNeed to share small pieces of code, notes, or other text-based content on GitHub? Gists are a simple tool that makes sharing easy.
These lightweight repositories let you share content without the complexity of setting up a full GitHub project.
Today, we’ll take a look at everything you need to know about Gists, including their key features, creation process, uses, backup capabilities, and more.
Key Features of Gists
Gists are one of the best-loved GitHub tools. Here’s why:
1. Code Sharing
You can easily share code snippets, configuration files, or quick fixes with GitHub Gists. Plus, every Gist has its own unique URL that makes sharing with colleagues or posting on forums straightforward.
2. Public and Secret Gists
GitHub Gists come in two forms – public and secret.
- Public Gists: Accessible to anyone and can be indexed by search engines.
- Secret Gists: Private and not listed publicly, but they can be easily accessed when shared through a direct link.
3. Version Control
Like standard GitHub repositories, Gists include version control. You can track changes and revert to previous versions if needed in just a few simple steps.
4. Markdown Support
Did you know GitHub Gists can support Markdown? This makes it simple to format your text to write everything from detailed notes to simple blog posts—all within Gists.
5. Integration
Gists easily integrate with popular Integrated Development Environments (IDEs) and text editors so you can create, edit, and share code snippets without leaving your development setup.
6. Fork and Clone
Finally, Gists let other developers fork your work, modify it, or clone it for local use. This feature is great for encouraging collaboration and further development.
How to Create a Gist
It’s easy to create a new Gist—just follow these simple steps:
- Log in to GitHub: Open your browser and go to GitHub. Sign in with your username and password.
- Go to the Gist page: Go to the GitHub Gists page once logged in.
- Add a description: Write a brief description of your Gist to explain what it contains.
- Paste your code or content: Copy and paste your code, notes, or text into the provided text area.
- Create the Gist: Click the “Create Public Gist” button if you want it to be public or the “Create Secret Gist” button for a private Gist.
Just like that, your Gist is live—and you’ll have a unique URL to share!
When Should I Create a Gist?
Not sure if you need a Gist or not? Here are a few circumstances when you might:
- Sharing small code snippets: When you only need to share a single file or script – not a full repository.
- Collaborative debugging: When sharing error logs or test cases with colleagues so you can work together to develop a solution.
- Storing notes or documentation: When keeping track of quick notes, guides, or instructions.
- Embedding code: When you want to easily embed your code from GitHub into websites or blogs.
When Should I Use Full Github Repositories?
Gists are great for quick sharing, but they’re not a replacement for full GitHub repositories. There are still certain times when you’ll need a full repository, including:
- Completing bigger projects: When handling complex projects with multiple files, directories, or dependencies. Git LFS also makes it easy to manage images or videos.
- Advanced features: When you need tools like issue tracking, pull requests, and a full history of code changes, opt for a full repository, which has these features built-in.
- Collaborating: When working with teams on complex projects that need more advanced version control, branching, and collaboration.
- Automating and integrating: When you need to integrate with CI/CD pipelines, GitHub Actions, and other automation tools.
- Moving large files: When using the REST API, each file in a Gist can only be 1 megabyte, maximum—which might not be enough for larger files.
GitHub vs Gist Comparison
Here’s a quick overview of Gists vs repositories.
|
Feature |
Gists |
Repositories |
|
Purpose |
Best for sharing small code snippets or notes | Best for managing complete projects with multiple files |
|
Structure |
Single file support |
Multiple file support (in folders) |
|
Features |
Basic version control |
More advanced version control (with commit history) |
| Collaboration | Simple sharing features |
Advanced team collaboration tools |
| Integration | Works with some external tools (text editors and IDEs) |
Compatible with a wider range of external tools (CI/CD, GitHub Actions, and more) |
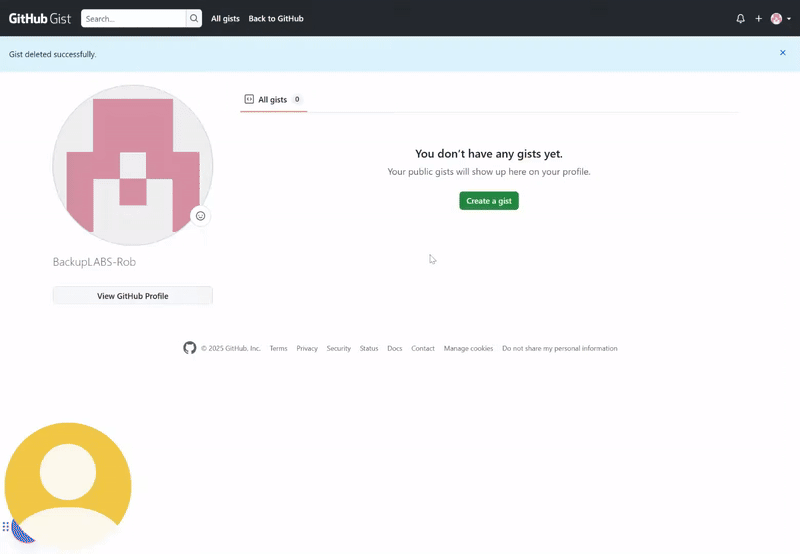
Are Gists Backed Up by GitHub?
No, Gists aren’t automatically backed up by GitHub. So, if something happens to your Gist – like an accidental deletion or loss of access – GitHub doesn’t have an automatic recovery process.
Thankfully, there are other actions you can take to protect your Gists (and full GitHub repositories) from data loss. You can create your own backup scripts or use a third-party backup service like BackupLABS.
BackupLABS, the only service that can specifically backup and protect your Gists, ensures your data stays safe and can be easily recovered in the event of data loss on GitHub.
Why choose BackupLABS?
Here are some of the many advantages of choosing BackupLABS for your GitHub Gists backups:
- Automated GitHub cloud backups: You can choose which specific data to protect in GitHub, with automatic backups taking place every 24 hours.
- Simple restoration process for disaster recovery: You can easily restore specific Gist data to your GitHub account and roll back to any previous versions you need.
- Backup visibility: You can see your backups as they happen and spot any errors in the process—all from your dashboard.
- Encryption: Your GitHub data is encrypted during the transfer and at rest.
Start your free BackupLABS trial today.
How to Export Your Data in NotionNotion is one of the most popular productivity and collaboration platforms out there now. It is used by over 35 million users worldwide (as of 2024) and competes with other apps such as Asana, Obsidian, OneNote, Trello, Monday, ClickUp and Jira.
It can be used to track various aspects of your personal life, project management, collaborate with others in an organization, task tracking, or even use it to run an entire company.
It stands to reason therefore, that there is an incredible amount of data held within Notion, and that data is critical to millions of users worldwide.
In this tutorial, we’ll guide you through the process of exporting your Notion data effectively.
Why Export Your Notion Data?
Notion declares that your data is safe in Notion. That may sound nice and reassuring, but their Terms and Conditions state something different:
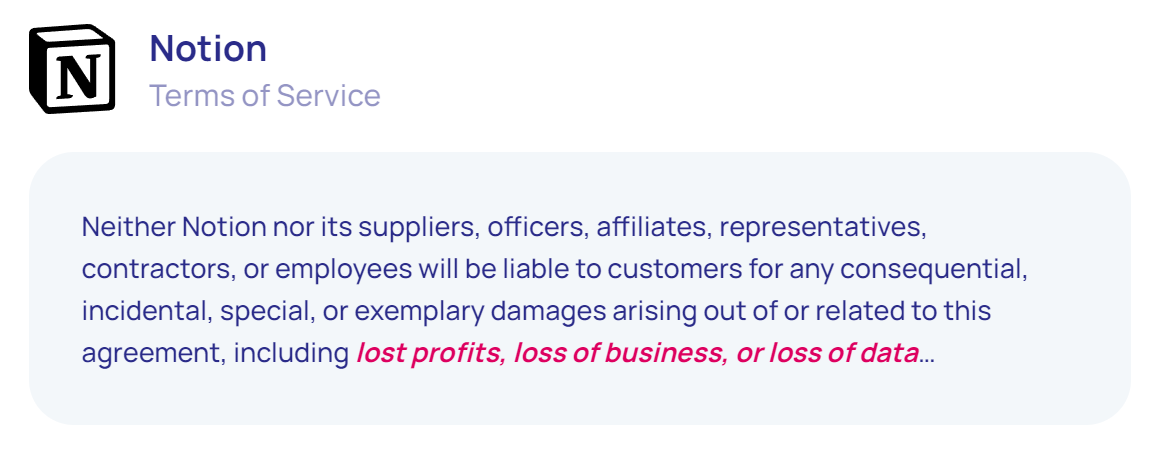
Notion is a cloud-based application. As with all “cloud” systems, it’s just someone else’s computer (or server). Notion will backup your data from an operational point of view in case they have a disaster, but there are various other risks to your data.
Notion operates on the Shared Responsibility Model, common with all cloud providers. Essentially this means that they look after their servers and Internet connectivity, but the actual responsibility for your data remains with you.
The most common reason for data loss is human error. Simply put, data is accidentally deleted. Notion does have a recycle bin, but this is limited to storing your deleted items for 7 days only on the Free Plan. The Plus Plan is not too much better but does give you 30 days to recover deleted data.
In addition to human error, there are other risks such as malicious employees, hackers/viruses, platform issues and compliance reasons such as ISO and SOC2. Only recently a Notion user on Reddit had all their Notion data deleted by Notion themselves.
It is therefore prudent to ensure that you have a copy of your data outside of Notion. Finally, you may wish to migrate your data away from Notion and into another productivity platform.
How to Export Your Notion Data
Exporting data usually takes a few minutes but can depend on the size of your workspaces. Let’s begin:
1. Log into your Notion account via your web browser. Note that exporting features is more straightforward on a desktop than on mobile.
2. On the left hand menu, select the workspace you wish to export.
3. Click Settings & members, then Settings.
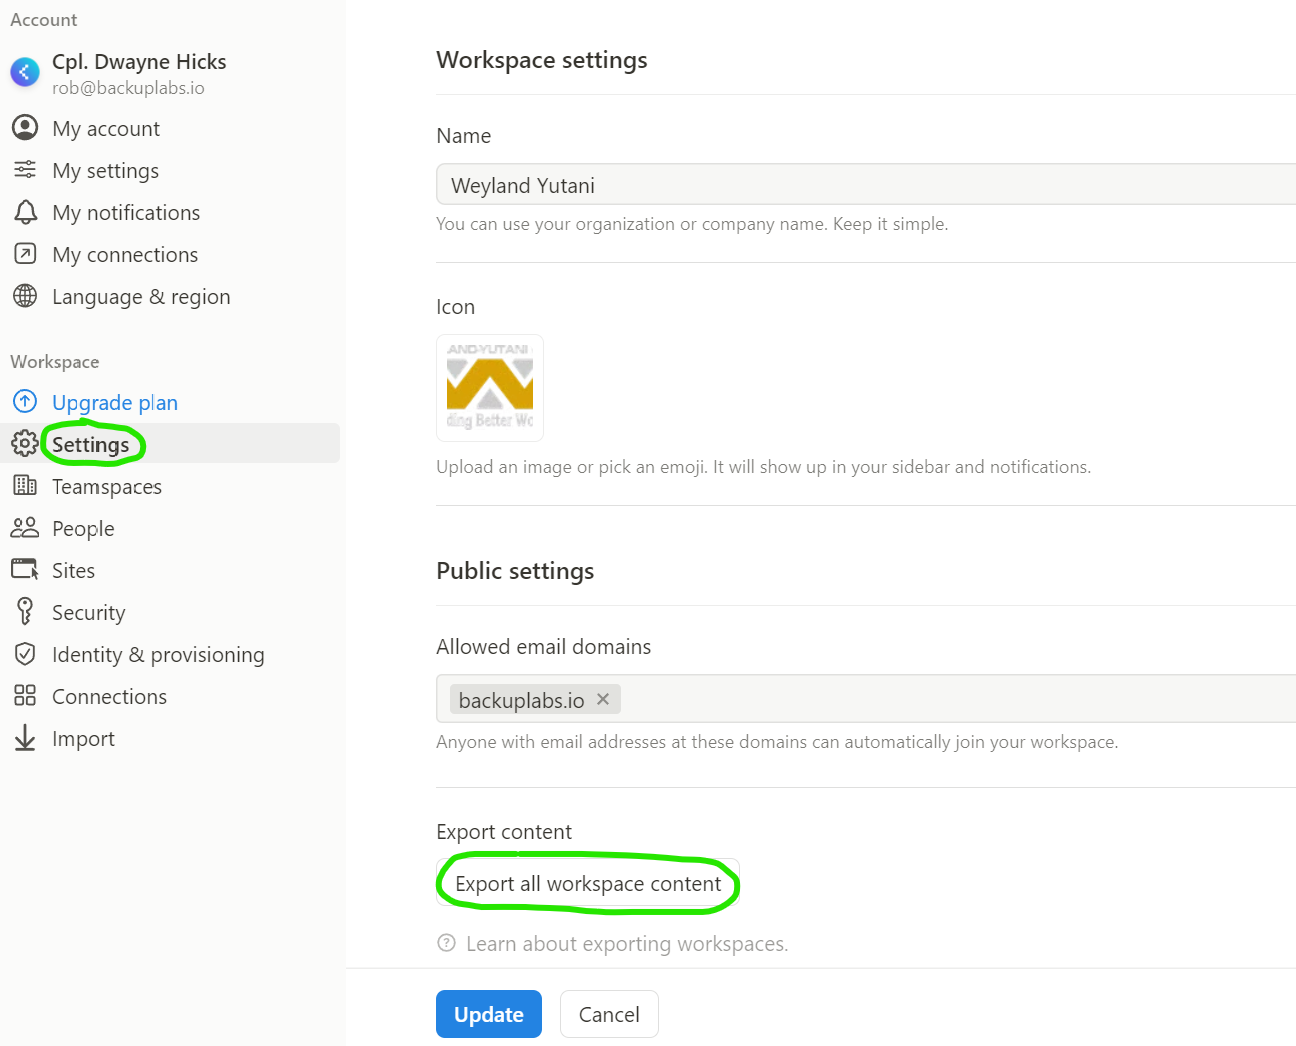
4. Click Export all workspace content.
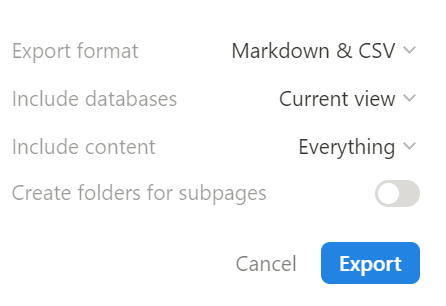
5. Choose the format you wish to export to (Markdown & CSV, HTML or pdf)
6. Select Export to download your data to your device.
7. You will also receive an email with a link to download your export.
Additional Tips
- Limitations: Keep in mind that some Notion features, such as database properties, may not fully transfer in Markdown format. Review your exported data to ensure everything you need is there.
- Regular Exports: Make it a habit to export your data regularly, especially before major changes or updates in your workspace.
- Restoring: Notion does not yet make it easy to recreate and import data directly back into Notion. There are additional steps that need to be taken to import data.
Automatic Notion Backup
Another method of backing up your Notion data is to use the third-party automatic Notion backup service from BackupLABS. Your Notion data can be encrypted and backed up every day to the BackupLABS secure platform. Backups can also be automatically exported to your own Google Drive for additional protection.
Protect your critical Notion data today with a free 14 day trial of BackupLABS.
Conclusion
Exporting your Notion data is a straightforward process that can save you time and provide peace of mind.
Whether you’re backing up your workspace or transitioning to another tool, following these steps will help you keep your information organized and accessible. Happy Notioning!
How to Delete a GitHub Repository in 2024GitHub is arguably the most popular tool for code collaboration. Its cloud-based platform allows developers to work together, share and store code in one central location. GitHub is based on Git, an open source version control system and allows developers to track changes to code over time.
In addition you can also use GitHub for bug tracking, task management and wikis for your projects.
In this guide, we will show you how to delete a GitHub repository and various other important points to consider along the way.
Before you delete a GitHub Repository
You can delete any GitHub repository, commonly known as a “repo” if you have administrator permissions for the repository or are the owner.
Warning! Deleting a repository is a permanent action on GitHub. Once deleted from GitHub it is not possible for GitHub to recover your data. The only way to recover deleted repositories is to use a third party GitHub backup solution such as BackupLABS.
If you delete a public repository, it will not delete any forks. However, if you delete a private repository, all forks will be deleted.
There are a number of things to consider before deleting a repository:
- Archive: You can easily archive a repository. This will allow you to read and also fork the repository but you are unable to make any changes. If your reason for archiving is to free up disk space though, you are out of luck. Archiving does not free up space on GitHub.
- Forking a repository: Forking allows you to create a copy of an existing repository. This fork shares code with the existing upstream repository, but is separate.
- Cloning a repository: Cloning in GitHub repository will create a local copy on your computer. Any changes you do on the cloned repository will sync back to GitHub.
- Backing up a repository: Using a third party backup provider such as BackupLABS will enable you to take automatic daily backups of repositories. If you accidentally delete a repository, you can restore back to GitHub in minutes.
How to Delete a GitHub Repository
Deleting GitHub repositories takes a few minutes to do. Let’s begin.
1. Log into your GitHub account and navigate to the repository you wish to delete
2. Click on Settings:

3. On the General area, scroll down to the bottom until you see Danger Zone.
4. Click Delete this repository:
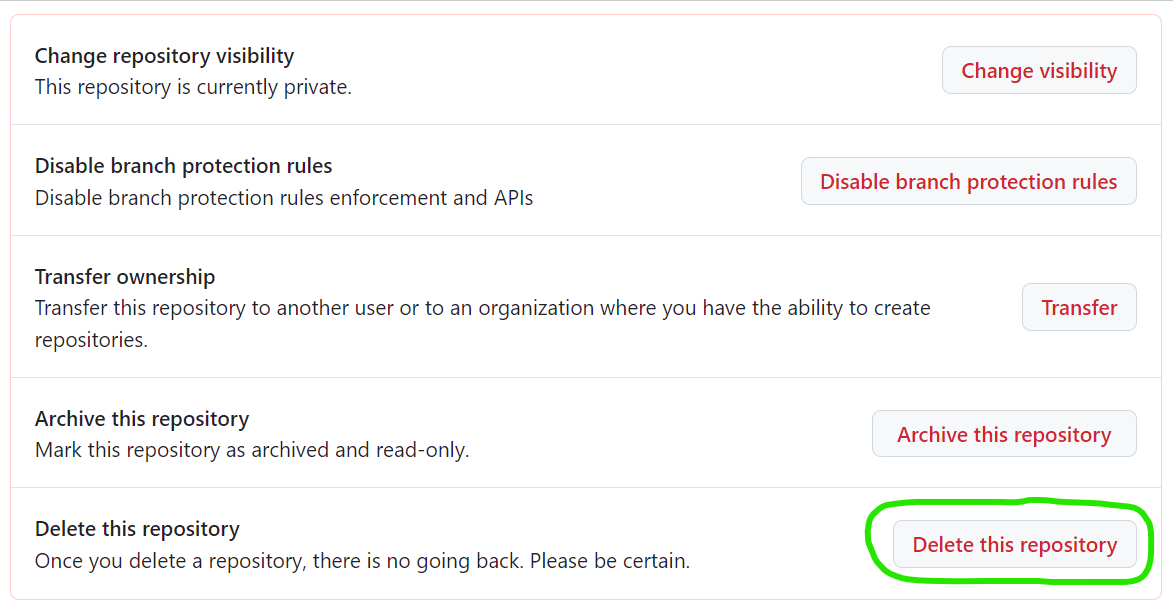
5. Click I want to delete this repository
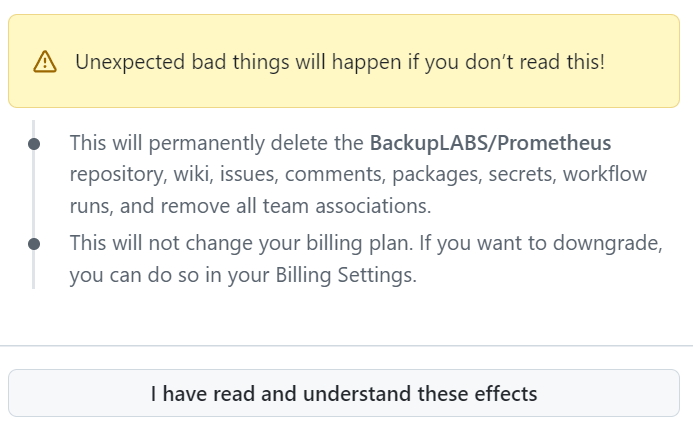
6. You will receive one final warning in a yellow box. Click I have read and understand these effects:
7. Lastly you will be asked to confirm deletion by typing in the name of the account and repository. Then click Delete this repository:
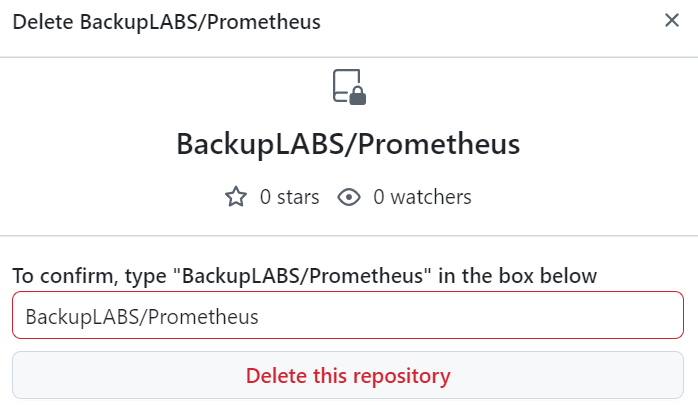
Thats it, your repository has now been permanently deleted.
Summary
Whilst deleting a repository is permanent on the GitHub platform itself, it is possible to still recover deleted repositories by using a third party GitHub backup service such as BackupLABS. A backup of a repository on BackupLABS enables users to restore deleted repositories back into GitHub in minutes.
Based on our research, the most common reason for data loss in GitHub is accidental deletion. Put simply, users are humans, and humans make mistakes. Other increasingly common reasons to recover data from GitHub are nefarious users/employees, bad software updates and viruses/malware. There have also been situations in the past where GitHub have been hacked themselves.
Protect your critical GitHub data today with a free trial of BackupLABS.
Troubleshooting Notion Backup: How to Resolve Page Saving IssuesNotion is a versatile, cloud-based workspace that offers a wide range of tools for collaboration and productivity. It’s a hub where your team can generate and exchange notes, files, databases and project outlines.
But smooth operation and data security are essential for productivity tools like Notion.
Notion guarantees smooth operations through quick loading speeds and a user-friendly interface. These features reduce interruptions for a productive workflow.
Recognising the importance of protecting valuable Notion data, the platform prioritises security measures like encryption, access restrictions, and consistent updates to safeguard confidential information.
Despite the benefits of Notion as a cloud-based workspace, users still face challenges that disrupt their workflow. This guide will focus on issues related to Notion’s ‘save changes’ feature and provide solutions to overcome these setbacks.
Issue #1: Cannot save changes
If you come across the message ‘cannot save changes’, rest assured it’s not due to an error on your part. It simply means there’s an issue preventing your Notion account from saving any changes you’ve made.
Step-by-step solutions
To resolve this issue on the web, desktop, or mobile, take the following steps:
Web platform
- Clear browser cache: To resolve any issues impacting Notion’s ability to save edits, start by clearing your browser’s cache and cookies.
- Reinstall the Notion application: If clearing the cache doesn’t work, reinstall the Notion application to refresh it and fix any underlying issues.
- Switch browsers: If the issue persists, try using alternative web browsers to access Notion, as sometimes problems may be specific to certain browsers.
Desktop platform
- Clear application cache: When using Notion’s desktop application, clearing the browser cache may not be relevant. Instead, try clearing the application cache or data through the application settings.
- Reinstall the Notion application: Like the web platform, reinstalling the Notion application on your desktop can resolve underlying tech problems.
- Using alternative platforms: If the previous steps haven’t worked, access Notion through alternative platforms like the web or mobile application.
Mobile platform
- Clear application cache: Clear the Notion application’s cache and data through the settings on your mobile device to resolve any temporary issues affecting the app’s performance.
- Reinstall the Notion application: Try uninstalling and reinstalling the Notion application on your device if clearing the cache hasn’t resolved the issue.
- Use alternative platforms: If the problem continues, access Notion through alternative platforms like the web or desktop application.
Issue #2: Not syncing across devices
Have you ever worked on a project using multiple devices only to find that some information didn’t update? Notion’s synchronisation is designed to solve this issue through:
- Real-time collaboration: Wherever you might be, your team can collaborate on a shared Notion page at any time. Changes are visible immediately to all team members, encouraging real-time teamwork and removing version control headaches.
- Offline access: Even offline, Notion lets you view and edit your content. Any edits are saved automatically and synced once you’re back online, guaranteeing productivity, even while you’re on the move.
Despite the advantages of Notion’s syncing abilities, sometimes syncing is not possible. Here’s how to tackle this problem:
Troubleshooting sync issues
- Restart and refresh: A simple refresh can sometimes solve Notion syncing issues. Close and reopen the Notion application on all devices, or clear your browser cache if using Notion’s web platform.
- Force a resync: The Copy and sync feature can also be helpful. Right-click a page (desktop) or tap the three dots (mobile) and select Copy to clipboard > Paste and sync.
- App reset: If the problem continues, reset the Notion app on each device to clear any temporary data causing conflicts.
- Reinstall Notion: As a final step, try deleting and reinstalling the Notion app. This is the most disruptive option, but it can resolve stubborn syncing problems.
The role of third-party backup solutions (like BackupLABS)
Cloud services like Notion provide built-in backup features to help protect your data. But these built-in backup features have limitations you need to be aware of, including:
- Limited control over backups and schedules
- Dependence on the service provider for backup management
- Short retention periods for backups
- Data security concerns
To overcome these limitations and ensure your data is always safe, you can combine Notion’s built-in features with a third-party backup solution like BackupLABS.
Advantages of using third-party Notion backups
1. Boosted security and data integrity
Third-party solutions like BackupLABS provide encryption and strong security protocols to safeguard valuable data stored in Notion against corruption and unauthorised entry.
2. Recovery options
If there are any issues with syncing or data corruption, third-party tools offer ways to recover your deleted pages or lost data. This includes features like:
- Version history
- Granular recovery options
- Automated recovery processes
3. Continuous backups
Continuous backups offered by third-party solutions protect against data loss by saving changes to data in real time or at regularly scheduled intervals. This means that even if your primary Notion backup fails, your crucial information is still safe and secure.
4. Customisation and flexibility
You can customise your backup schedules, data retention periods, and storage setups according to your needs.
5. Comprehensive coverage
Third-party backup services support various data sources and platforms – like cloud-based applications and on-premises systems – all from a single platform.
6. Regulatory compliance
Third-party backup solutions aid in regulatory compliance for data protection and privacy by integrating features like encryption, access controls, and audit trails.
Why choose BackupLABS as your Notion backup solution?
BackupLABS offers seamless protection for your Notion workspaces and pages, ensuring they’re backed up within minutes. This guards against common Notion issues, syncing errors, and failed changes saving.
Plus, your Notion workspace content is shielded from threats like human errors, cyber attacks, and natural disasters.
Should any mishaps occur, BackupLABS allows you to effortlessly restore and roll back to specific dates. Rest assured that restoration never overrides your original data, keeping it intact while creating a new instance.
You can connect your Notion workspaces to BackupLABS and schedule automatic backups with a few clicks for complete convenience.
Try BackupLABS for yourself. Sign up for our 14-day free trial.
Can You Recover a Deleted Notion Account?Are you thinking about deleting your Notion account, or have you already taken this step?
Then, you might be wondering about the possibility of reversing the process and recovering your deleted data.
This blog aims to address those concerns. From guiding you through deleting your Notion account to exploring potential recovery methods, we’ll cover everything you need to know to make informed decisions about managing your Notion data.
How to delete a Notion account?
To delete your Notion account, take the following steps:
- Go to Settings & members, then click My Account.
- Scroll down until you see the title Danger Zone and click Delete my account.
- Before your account is deleted, a pop-up will ask if you want to proceed and list any workspaces that will be deleted.
- To continue, enter your account email and click Permanently delete account and workspaces.
What happens when a Notion account is deleted?
When you decide to delete your Notion account, it’s important to understand the finality of this choice.
Your account and all associated data will be permanently removed from Notion’s servers. Notion itself highlights the importance of confirming the deletion with caution.
When you delete an account in Notion, the platform will:
- Delete the account associated with the email address entered
- Delete private workspaces in which you are the only member
- Delete shared workspaces in which you are the only admin
- Remove you from shared workspaces where you’re a member or one of multiple admins.
How to recover Notion data
Standard methods of recovering Notion data include:
Contacting customer support
If you’ve deleted your Notion account and need to recover specific data, there’s a chance you can do so within 30 days by contacting Notion support.
But it’s important to note that this isn’t a guaranteed solution. Data recovery success can vary based on factors like the nature of the data and the timing of the request.
Using data recovery tools
Notion provides built-in tools that can help recover data. These include:
- Trash: When you remove a page or entry in Notion, it’s moved to the Trash bin, where it stays for 30 days. Within this period, you can retrieve deleted pages or entries from the Trash and place them back within your workspace.
- Page history: Notion records all changes made to your pages, allowing you to view edit history. This means you can restore the page to any specific point in its edit history.
The limitations of Notion’s data recovery methods
Although Notion allows you to restore specific pages and reverse changes made within a workspace, recovering a completely deleted account is generally impossible once the deletion process is completed.
These limitations are most apparent in circumstances including:
Migrating content to a different workspace
Notion lacks a direct feature for transferring entire workspaces. While you can move pages or databases manually by copying and pasting or using the export/import function, this method doesn’t always smoothly transfer permissions and integrations across workspaces.
This means that without paying attention to specifics, data or important components can be lost during the switch.
Accidental deletions
Accidentally removing pages or databases from Notion can cause issues due to the platform’s limited recovery capabilities. Once items are permanently deleted from the Trash bin after 30 days, Notion’s built-in tools cannot recover them.
How to prevent Notion data loss
Protecting your Notion data is crucial for staying productive and avoiding data loss. Below are steps you can take to secure your information and reduce the chances of losing valuable data.
1. Regular backups
Periodically export your workspace data manually to rest assured the backup is stored securely outside Notion.
2. Automated backup solutions (like BackupLABS)
Think about using an automated backup solution like BackupLABS’ automated Notion backup service to guarantee that your data is routinely and securely backed up without manual intervention.
3. Consistent log-in method
Always use the same log-in method on all your devices and platforms when accessing Notion or creating a new workspace. When you use multiple login details, you run the risk of data discrepancies or losing access to workspaces.
4. Provide education and training
Offer training and support to all Notion users in your organisation so that everyone understands the ins and outs of handling data safely and responsibly.
5. Carry out audits
Regularly check your Notion workspaces for any duplicated content and remove unnecessary data to streamline your workspace and reduce the risk of data loss.
6. Version control
Use Notion’s built-in version history feature to track changes made to your pages and revert to previous versions if necessary.
7. Collaboration best practices
Set up communication and collaboration guidelines within your team to reduce the chances of unintended data clashes or loss while editing.
Why use BackupLABS as your backup solution?
BackupLABS offers a reliable and comprehensive cloud backup solution for Notion databases, equipped with top-notch security features and excellent customer support.
We provide a complete cloud backup solution with the following capabilities:
- User-friendly interface: Our system is crafted for simplicity and user-friendliness, guaranteeing a smooth experience for all users.
- On-demand backups: You can start account-level backups whenever you want without any limitations. Additionally, our service allows you to create a disk image backup, ensuring that your entire Notion workspace can be easily recovered whenever needed.
- Revision history preservation: Each backup keeps a complete revision history of every file so you can easily keep track of changes.
- Ownership assurance: You can download copies of your backups whenever you like for guaranteed data ownership.
- Instant bulk restores: Recover multiple files from your cloud storage backup archive quickly and easily.
- Instant cloning: Quickly create clones during the restoration process for added flexibility.
- Responsive customer support: Our support team can assist you with any queries or issues.
- Security alerts and notifications: Stay informed with timely security alerts to keep your data safe.
Try BackupLABS for yourself. Sign up for our 14-day free trial.
Notion Productivity: How to Export Notion Content with EaseNotion, the Swiss Army knife of productivity tools, is your go-to platform for everything from note-taking to project management. But what happens when you need to share your meticulously organised data with others, or simply ensure it’s safely backed up?
In this guide, we’ll walk you through the simple process of exporting your Notion content, helping you take control of your data and ensure it’s accessible whenever and wherever you need it.
Exporting individual Notion pages
Exporting a single Notion page can come in handy when you need to share specific information or back up important notes.
Whether it’s a brainstorming session, meeting minutes, or specific data you need for a business or enterprise plan, having the ability to export individual pages ensures you can easily share, separate, or safeguard your valuable content.
Here’s how to carry out a single-page Notion export:
- Navigate to the page you wish to export.
- Click on the three-dot menu at the top-right corner of the page and click Export.
- Choose from a range of formats including PDF, HTML, Markdown, or even Word.
- Follow the prompts to download your exported file.
Exporting entire workspaces or databases
Sometimes, you need to export more than just a single page — perhaps to migrate an entire project or share an extensive Notion database with collaborators.
In such cases, exporting entire workspaces or databases becomes essential, allowing you to maintain the structure and hierarchy of your content while ensuring all relevant information is transferred seamlessly.
If you need to export a larger set of pages, or even an entire database, here’s how:
- Head to Workspace settings to initiate the export process.
- Select the desired format for your export file, whether it’s PDF, HTML, Markdown, or CSV.
- Once the export is complete, download the file to your device for safekeeping or sharing.
Tip: When exporting Notion pages, it’s important to keep your files organised and manageable. For extensive workspaces or full-page databases, you can export Notion pages in a more controlled manner by compressing your exports into a zip file before downloading. This keeps your data neat and tidy, making it easier to share with collaborators or store securely for future data analysis.
Advanced exporting via API
Notion’s API opens up a world of possibilities when it comes to data exports for those with coding knowledge and customisation experience.
By tapping into the API, you can customise the export process to meet your individual needs, whether it’s extracting data for analysis, integrating with other tools, or automating complex workflows.
Essentially, the API enables you to take full control of your data and export a Notion page in a way that aligns perfectly with your preferred way of working.
But, before diving into advanced exporting, we recommend that you:
- Evaluate your understanding of programming and API integration
- Understand your specific export requirements and objectives
- Review Notion’s API documentation thoroughly to grasp its capabilities and limitations
- Experiment with small-scale API integrations to gain practical experience
- Consider seeking guidance from experienced developers or online communities for additional support and insights
Export format options
Notion offers a variety of export options to cater to different preferences and use cases.
Whether you prefer the versatility of PDF, the simplicity of HTML, or the flexibility of Markdown and Comma Separated Values (CSV) files, there’s a format to suit every need.
Each option also comes with its own set of features and customisation settings, allowing you to fine-tune your exports according to your requirements.
Explore the different export formats offered by Notion to find the one that best suits your needs:
- PDF: Customise your export to include databases and subpages, adjust page format, and scale to your preference.
- HTML: Enjoy the simplicity of HTML exports, with a zipped file containing HTML and images for easy sharing.
- Markdown & CSV: Get formatted Markdown pages along with a CSV file of your database content, perfect for further analysis or sharing.
Tip: When it comes to a Notion page export, Notion table data can be efficiently handled using the Markdown & CSV format. A simple copy and paste may not work due to the differences in markdown between Notion and Excel, so it’s advised to follow Notion export instructions for best results.
Backing up Notion with BackupLABS
Now that you’ve mastered the art of exporting Notion content, it’s time to keep your data secure with a Notion backup.
With BackupLABS, you can protect your valuable Notion workspaces and pages automatically. Scheduled backups and straightforward data restoration give you complete peace of mind over the safety, security, and accessibility of your data.
Our seamless integration with Notion means your Notion workspaces and pages are safeguarded against any unforeseen events, helping you maintain uninterrupted productivity and collaboration.
Here are just some of the features BackupLABS users love:
- Automated backups: BackupLABS allows you to automate the backup process, keeping your workspace and pages regularly backed up without manual intervention. This automated approach minimises the risk of data loss due to human error or unforeseen circumstances.
- Secure storage: With BackupLABS, your data backups are stored securely in the cloud, protected by encryption and other advanced security measures. This safeguards your data from unauthorised access and potential threats, while ensuring easy access for authorised users.
- Simple restoration: In the event of data loss or corruption, BackupLABS makes it easy to restore your backups with just a few clicks. Whether you need to recover a single page or an entire workspace, the restoration process is quick and hassle-free.
- Version history: BackupLABS maintains a comprehensive version history of your backups, allowing you to roll back to a previous state if needed. This feature provides added peace of mind, knowing that you can always revert to a previous version of your data if necessary.
- Cross-platform compatibility: Whether you’re using Windows, macOS, iOS, or Android, BackupLABS ensures cross-platform compatibility, allowing you to seamlessly backup and restore your data across all your devices.
Take control of your Notion data today. Visit BackupLABS now to learn more, or sign up for our 14-day free trial.
Mastering GitLab Repository Cloning: A Step-by-Step GuideGitLab plays a significant role in transforming version control and collaborative software development. In fact, its impressive features and easy-to-use interface have increased output and simplified DevOps processes for many modern businesses.
Cloning repositories in GitLab is part of the development process, supporting version management and fostering collaboration in software creation. When you clone a repository, it essentially creates a duplicate of the project, allowing access, editing, and participation in the codebase.
When it comes to repository cloning and management, third-party backup solutions for GitLab are a great way to protect your organisation from the threat of data loss.
This proactive approach to data protection gives you the peace of mind to focus on coding without worrying about the integrity of your critical data.
This blog shares everything you need to know about cloning a repository in GitLab, including a step-by-step guide to the process and how to manage cloned repositories and forks.
Creating and cloning a GitLab repository
Creating a GitLab project
- Log in to your GitLab account, and on the left sidebar, select Create new > New project/repository.
- Provide the details for your project, including the project name, URL, and visibility (private, internal, or public).
- You can initialise the repository with a README file, which is recommended.
- Once you have filled in the project details, you can add additional files. Once you’ve done so, click Create Project.
- After creating the repository, you can check if the cloning is working correctly by cloning the repository to your local machine. Copy the repository’s URL from the project page and use the git clone <repository_url> [<local_directory>] command in your terminal or command prompt.
- Replace <repository_url> with the URL of your GitLab repository.
- Navigate to the cloned repository directory on your local machine and verify that the README file (if initialised) and any other added files are present.
How to clone a repository on GitHub Desktop
- Go to your GitLab project (repository) and tap “HTTPS” to view the repository address.
- Copy the HTTPS address of your GitLab project repository.
- Launch GitHub Desktop, tap the File Menubar item, and choose Clone Repository.
- Tap the URL tab and paste the previously copied HTTPS URL into the repository URL field. Then click Clone.
- Once the cloning process is complete, you can select the cloned repository by clicking on the Current Repository dropdown menu at the top of the GitHub Desktop window.
How to clone a repository on Git Bash
- Log in to your GitLab account and navigate to the existing Git repository you want to clone. On the repository page, look for the HTTPS clone URL.
- Open Git Bash and use the cd command to navigate to the directory where you want to clone the repository. For example: cd path/to/directory
- In Git Bash, use the git clone command followed by the repository URL to clone the repository to your local machine and press Enter.
- After running the git clone command, Git Bash will start cloning the repository from GitLab to your local machine.
- Once the cloning process is complete, go to the directory where you cloned the repository using the cd command.
- You can now use the ls command to list the files in the cloned repository and confirm that the new Git repository has been successfully created.
Common issues during GitLab cloning
1. Git is not installed
If your computer doesn’t have Git set up, you might see an error saying it doesn’t recognise the Git command.
Resolution: Download and install Git from the official Git website. After installation, you should have no issues using Git commands like git clone.
2. Incorrect repository URL
If you enter an invalid URL, you’ll receive an error message stating that the repository cannot be located.
Resolution: Make sure to verify the repository URL to confirm it’s accurate and correctly formatted.
3. Network connectivity issues
If your internet connection is too slow or unstable, the duplication process might not work properly and become stuck.
Resolution: Double-check that your internet connection is good and stable. If needed, restart your router or switch to another network. Another option is to use a VPN to improve your connection.
4. Insufficient disk space
If your computer doesn’t have enough storage space, the duplication procedure might fail or result in an unfinished clone.
Resolution: Check how much space is left on your computer before beginning. Clear out some files or apps you don’t need if more space is required for the copied repository.
Managing cloned repositories and forks
What is a fork in GitLab, and how do you manage a forked repository locally?
In GitLab, a fork is a duplicate of a repository created by an individual or group. Creating a fork enables users to test out modifications without impacting the repository.
This practice is often seen in teamwork scenarios, allowing collaborators to suggest alterations or enhancements to a project without altering the source code.
How do you set up and manage remotes in GitLab?
Rename the original Git repository from remote to upstream
- If you’ve already cloned the original repository, go to the directory of your repository using the terminal or command prompt.
- To change the name of the original remote repository to ‘upstream’, enter this command: Git remote rename origin upstream
Adding your fork as the ‘origin’ remote:
- Get the URL of your forked repository on GitLab, and if you’re not already in its directory, navigate there.
- Add your forked repository as the ‘origin’ remote using this command: git remote add origin <fork_repository_url>
- Replace <fork_repository_url> with the URL of your forked repository, which you got from GitLab.
The importance of keeping both the fork and the original repository updated with changes
There are many reasons why it’s important to keep both the fork and the existing repository updated, including:
- Keeping up to date: Ensures access to the features and enhancements implemented by other team members.
- Preventing code inconsistencies: Reduces the risk of straying from the original project and makes it simpler to merge changes.
- Minimising conflicts during merging: Helps prevent clashes between your modifications and updates from the project.
- Streamlining contributions: Simplifies giving back by aligning your changes with the latest version.
- Preserving data integrity: Upholds precise version control, boosting the dependability of your forked repository.
The importance of third-party data backup solutions for protecting your GitLab data
Using third-party backup tools like BackupLabs is important for protecting your work on GitLab repositories, especially when cloning or managing large projects.
As projects grow, the chances of losing data due to accidental deletions, system malfunctions, or human errors rise substantially.
In these situations, a reliable backup service can protect against potential setbacks and guarantee the continuity of your development efforts.
Why choose BackupLABS as your backup solution
BackupLABS offers a comprehensive suite of features to provide GitLab users with complete peace of mind about the integrity of their data. These include:
- Automatic backups: BackupLABS regularly backs up your GitLab repositories, guaranteeing that any recent modifications and updates are safely preserved.
- Easy recovery options: If data loss or corruption occurs, BackupLABS offers easy and efficient recovery options to minimise downtime and eliminate the impact on ongoing projects.
- Robust data protection: BackupLABS uses strong security measures, including encryption and access restrictions, to protect GitLab data from unauthorised access, data leaks, and other potential security risks.
- Compliance: BackupLABS keeps accurate and easily-accessible records of your GitLab data history so you maintain compliance with data regulations.
- 24/7 dedicated support: Enjoy a round-the-clock support team that can assist you with any issues, night or day.
Are you ready to backup GitLab with BackupLABS?. Sign up for our 14-day free trial.